Today, we're discussing AWS Amplify. If you're not already know, Amplify is an AWS-provided development platform for creating safe, scalable mobile and online applications.
According to AWS: "The Amplify Framework provides a set of libraries and UI components and a command-line interface to build mobile backends and integrate with your iOS, Android, Web, and React Native apps. The Amplify CLI allows you to configure all the services needed to power your backend through a simple command-line interface. The Amplify library makes it easy to integrate your code with your backend using declarative interfaces and simple UI components."
But if I had to sum up Amplify in a sentence this is what I would say: : "AWS Amplify is a serverless framework that offers products to build full-stack iOS, Android, Web, and React Native apps."
Why AWS Amplify was Invented?
AWS already offered a fantastic Backend as a Service (BaaS) toolset before Amplify, allowing you to build a full serverless backend without having to manage anything (including API, storage, database, authentication, authorization, & so on). But there are no pre-designed architecture solutions when it comes to interacting with your frontends (web or mobile). I believe that because so that specific reason Amplify's was invented.
For me Amplify can be described as many important components:
CLI
The CLI is an open-source interactive toolchain you can use to create and manage a backend for your apps. Start your project by running npm install -g @aws-amplify/cli . You can establish a project using the CLI and add resources from different categories to it (api, auth, hosting, storage, etc.).
When using the AWS Amplify CLI, you may add or change configurations locally before pushing them for deployment in your account thanks to the utilization of AWS CloudFormation and nested stacks. It allows for full transparency. Run amplify status to see the status of your resources at any time.
Your infrastructure is created using CloudFormation templates using Amplify CLI. In the "amplify/backend/auth" folder, for instance, running amplify add auth will bootstrap a CloudFormation template.
Services
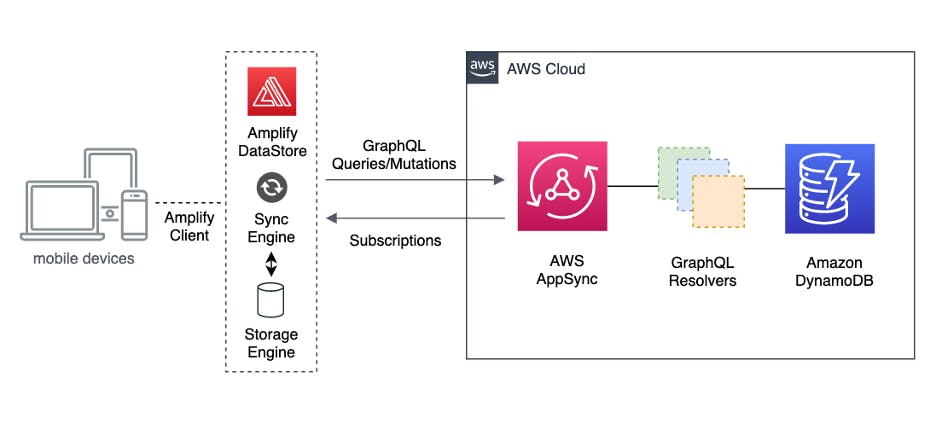
Amplify will handle establishing and managing all the resources (DynamoDB tables, AppSync resolvers, Lambda functions,...) for you if you only configure your data model using GraphQL Schema Definition Language (SDL). Additionally, it provides subscription utilising WebSockets to provide your app some real-time functionality.

Amplify Console
To deploy and host full-stack serverless web apps, you'll discover a Git-like workflow in the console. You begin by establishing a connection to your repository, where you can now choose to use a monorepo.
The build settings can then be modified, starting with the default YAML. It is already set up to run yarn install and yarn build for a node project. You can add unique commands to that script if your configuration is different. Use your own build image if you'd like. AWS manages the build instance provisioning, clones the repository, performs the build step, and then configures a CloudFront distribution during the build stage.
A testing stage can be added if desired before the initial deployment. You can use a URL provided by Amplify to access the app when it has been released. Numerous URLs will be generated for you if you link multiple branches. The last step is verification, which includes screenshots of the app on a few different mobile devices.
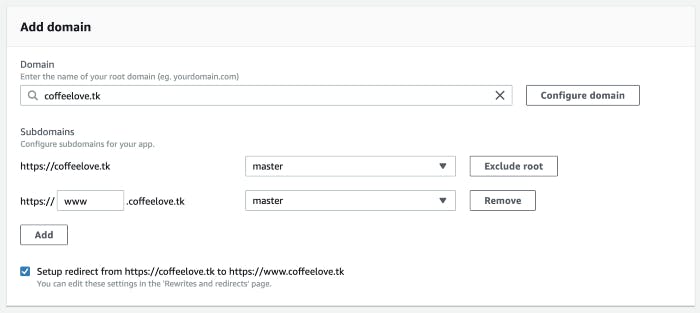
One of my Fav feature is Custom Domain with Free SSL Certificate
First you have to buy domain from domain websites like GoDaddy, Namecheap, etc. you should configure its nameservers to point to AWS.
It can be found inside “Domain Management” section in the AWS Amplify Console.

You can configure your personal domain according to your needs.

Your domain is instantly associated with the managed SSL certificate that AWS Amplify Console has acquired from AWS.
Others benefits
CI/CD: Yes, you can set up a comprehensive CI/CD pipeline with Amplify Console that complies to the git flow, create feature environments instantly, define domains, and manage access—basically, all your DevOps!
Push alerts, machine learning, chatbots, analytics (user tracking), and possibly more are on the way. Amplify, in my opinion, is being used by AWS to highlight a number of new capabilities.
Setting up a new project with Vue CLI

This Workflow is going to be followed in below demo app.
Use the Vue CLI to start a new project to get going. Go directly to the next step if you already have it. If not, do so and develop the application using:
yarn global add @vue/cli
vue create amplify-app
Before moving on, navigate to the new directory and ensure everything is in order.
cd amplify-app
yarn serve
Setting up Amplify project
You can build many environments using AWS Amplify to specify your preferences and settings. You must use the command below for any new project and respond as follows:
amplify init
- Enter a name for the project: amplify-app
- Enter a name for the environment: dev
- Choose your default editor: Visual Studio Code
- Please choose the type of app that you’re building javascript
- What javascript framework are you using vue
- Source Directory Path: src
- Distribution Directory Path: dist
- Build Command: npm run-script build
- Start Command: npm run-script serve
- Do you want to use an AWS profile? Yes
- Please choose the profile you want to use default
The new project and folder named amplify have now been initialized by the Amplify CLI. This folder's files include the project settings.
Installing the dependencies
Install the required dependencies for AWS Amplify and Vue using:
yarn add aws-amplify @aws-amplify/ui-vue
Authentication
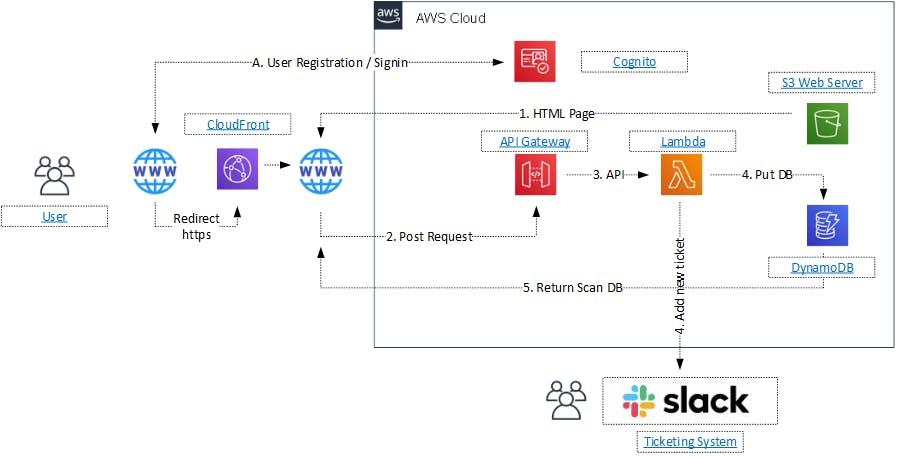
By using the auth category of AWS Amplify, which enables authentication, we can access AWS Cognito. Please use the following command to add authentication:
amplify add auth
When prompted choose:
- Do you wish to utilise the authentication and security settings that are default? Default setting
- When using your Cognito User Pool, how do you want users to be able to sign in? Username
- Would you like to set up advanced settings? No
Push changes
The cloud resources will be created and provided in your AWS account when you run the push command.
amplify push
Run the following command to rapidly verify your freshly formed Cognito User Pool:
amplify status
Configuring the Vue application
Referencing the automatically created aws-exports.js file that is now located in your src folder. Open main.ts and add the coding listed below the last import to setup the app:
import Vue from 'vue'
import App from './App.vue'

import Amplify from 'aws-amplify';
import '@aws-amplify/ui-vue';
import aws_exports from './aws-exports';

Amplify.configure(aws_exports);

Vue.config.productionTip = false

new Vue({
  render: h => h(App),
}).$mount('#app')
Authenticator Component
You can use the UI elements from AWS Amplify in your app. Let's incorporate these elements into the project.
Add the authenticator component to src/App.vue in order to use it:
<template>
  <div id="app">
    <amplify-authenticator>
      <div>
        <h1>Hey, {{user.username}}!</h1>
        <amplify-sign-out></amplify-sign-out>
      </div>
    </amplify-authenticator>
  </div>
</template>
<script>
import { AuthState, onAuthUIStateChange } from '@aws-amplify/ui-components'

export default {
  name: 'app',
  data() {
    return {
      user: { },
    }
  },
  created() {
    onAuthUIStateChange((state, user) => {
      // load data after login
      if (state === AuthState.SignedIn) {
        this.user = user;
      }
    })
  }
}
</script>
Run the app to see the addition of an authentication flow in front of your app component. Users can register and sign in using this flow.
Publishing app
Using the hosting category, we may launch and host your project on AWS.
amplify add hosting
- Select the plugin module to execute: Amazon CloudFront and S3
- Select the environment setup: DEV
- Hosting bucket name: FIRSTPROJECT
- Index doc for the website server.html
- Error doc for the website server.html
Now, everything is set up & we can publish it:
amplify publish
Conclusion
The deployment of websites and mobile apps is made simpler with AWS Amplify. Powerful web hosting options that you can quickly enable with Amplify Web Hosting were covered in this post. And Congratulations! You successfully built your first full-stack serverless app using Vue and AWS Amplify. If you have any doubts fell free to ask any question. Thanks for reading the article 😎💙.
